 Ever seen a black and white photo where a shirt, a balloon or some other object appears in full color while the rest of the image is all black and white? Ever wonder how it’s done? You may think it’s a simple painting of that image. Wrong. That image where there’s one item or area of the photo in color while the rest remains in grayscale started off in most cases as a full color image. In this tutorial, you’ll learn how to use the selective color tool in Photoshop to highlight one color in an image to create a stunning photograph.
What You’ll Need:
1. Photoshop (I used CS2 to do this tutorial and so you should be able to use everything from CS2 up to CS5 to do this tutorial)
2. A photo (The more colorful the photo, the better the results).
Here’s how to do it:
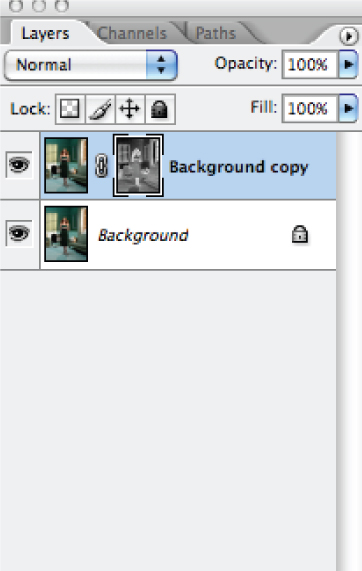
Start off with any image. This tutorial and effect works best with a colorful photo. Open the photo in Photoshop and immediately duplicate the image into a new layer. You should see something like this in the layers menu:
 You’ll want to select the top (unlocked) layer. This is the first layer we’ll do work with. With this top layer selected go to the menu bar and under “Select” and choose “Color Range…”. This is where you will identify the color that will be highlighted in the final version of the photo.
The “Color Range” box will come up. In “Select” you’ll want to choose ‘Sampled Colors’; you’ll want to use the simplest eyedropper and for “Selection Preview” choose White Matte. The image will appear as a negative (black and white colors) in the “Select” box. Move your cursor over this negative image and the eyedropper tool will appear. This is where you play around and find out what works best for your particular photo. Click on different areas of the photo with the eyedropper and in the main photo off to the side you will see what colors are highlighted. If you wanted to pick up the green color in Cross’ dress rather than the red tones in her hair, you would click on different parts of her dress or even the floor to see what colors would be highlighted. You can also move the “Fuzziness” cursor to the left or right. I’ve found that the further right, the more intense the color. Move the cursor to the left if you want a more subtle, light treatment. Once you’ve gotten your color range chosen, click “Ok”.
After clicking OK you’ll see parts of the image surrounded by a dotted line or special selection area. You will want to change this selection area into a mask. To do this, in the layer panel you can choose the square with the circle in the middle. Or “Layer > Add Layer Mask > Reveal Selection/Hide Selection” will do the same thing. In the layers panel you should see the following:
 You should now see a mask has been added to the top layer that you’ve been working with. The hard part of the tutorial is over. Now you need to knock out all of the distracting colors. Click on the bottom layer and in the menu bar choose “Image > Adjustments > Gradient Map”. The “Gradient Map” box will come up and you’ll want to choose the black/white gradient option. You’ll see that suddenly all of the color disappears from the image with the exception of that special mask you created in the last step. You should see something like this:
 If you want to go crazy with the color and have a different gradient other than black & white, you can choose some of the other gradient options. However, if what you see is what you like, just click “OK” after choosing the black & white gradient. Now you should have a stunning, fashionable photo that will feature a very selective range of color:
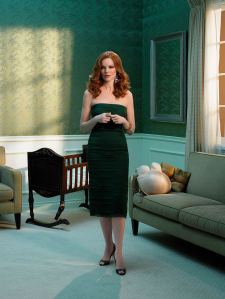
 Why would you want to use this Photoshop technique? It’s great for fashion layouts – fashion is mostly about the clothes so you can use this Photoshop tutorial to bring the attention to an item of clothing rather than having a photo that’s all color and where the clothes may not be the big focus of the image. Also, it’s just a fun tutorial to use to bring attention to one item or part of a photo. For this image, Marcia Cross is known for her firey red hair: while it stands out in the original photo, this effect helps to really bring the focus to her hair and beauty. This effect can also add a great dramatic effect to a photo. Take notice how the before and after shots have completely different moods: the before shot is rather pop-art inspired while the second is darker, moodier, more mysterious.
Here’s a before and after of an image. This will be your goal in this tutorial:
 You’ll notice that in the original shot featuring ‘Desperate Housewives’ star Marcia Cross, the photo is saturated heavily in a teal blue or greenish overtone. In the after shot, that color is removed and the photo is mostly grayscale with the exception of the red tones that appear in her hair, skin and in some of the surrounding furniture.
Follow me on Twitter @antoinereid
LinkedIn http://www.linkedin.com/in/antoinedreid
“Like” Antoine Reid Designs on Facebook
Visit my Web site www.antoinereid.com/contact.html


nice tip you have here i liked it 😀
Sometimes because of bad photography photo comes very dark and we want to modify it with bright color and sometimes because of our requirement to change color of different elements in the photo so this tutorial is the perfect for these two needs.